Thanks for stopping in to check out the December and January combined post! With a shortened month of of school leading up to winter break, I figured we would just glide right into January with our art blog post.
Take a look at each grade level below to see what the students have been up to...
Kindergarten artists completed their Clay Cupcakes! The students learned a variety of basic clay making techniques including: shaping pinch pots, rolling out a long coil, creating a topper, and attaching the clay topper using the "4 S's" (score, slip, stick, and smooth). The students had a great deal of fun making the projects, and many of the older students were amazed (and some jealous) when they learned kindergarten students made them.
After the clay had dried out, it was bisque fired in the kiln, and then painted by the students using tempera paint. We finished the scrumptious cupcakes by adding a coat of mod podge for shine, and real sprinkles for some added texture and fun :) Luckily, no students tried to eat them this year (usually there's at least one ;)
The students are now returning to a previous project we had started before break... Catching Snowflakes, a mixed media self portrait project of the students catching snowflakes. I like to read two books during the making of the artwork, "The Jacket I Wear in the Snow" and "Snowflakes Fall." The first book, connects to the designing of the mittens and all the winter gear that the child has to put on in the book. The kindergarten artists designed their own pair of mittens with oil pastels and paint, while attempting to make their designs symmetrical. The following class they enjoyed creating sleeves and a hat to become part of the matching set.
Soon, we will be creating the background (a wintery night sky with large uniquely printed snowflakes) and then lots of cutting, arranging, and gluing will follow. We look forward to sharing our completed artwork soon!


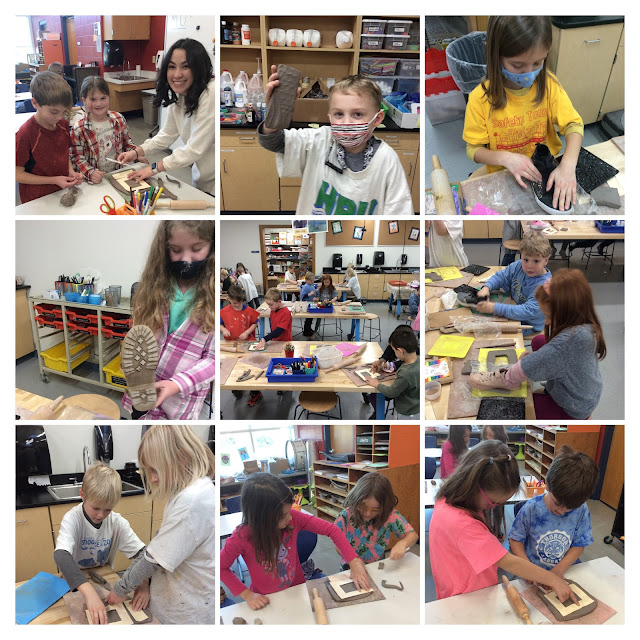
First grade artists also wrapped up their clay making unit by putting finishing touches on their one of a kind snowmen (and women :)! The project is a step up from kindergarten in the clay making skills needed to make the artwork. The students needed to create three clay pinch pots (small, medium, and large) to be disguised as snowballs. They were then asked to give their snow person a headpiece and neckpiece, as well as a face. Many of the students went above and beyond and enjoyed adding extra features like snow friends, family members, pets... even snakes (for whatever reason we had a lot of snakes attached to the snowmen this year, haha).
After adding holes into the sides of the snowman (for stick arms) and letting them dry out, the projects were bisque fired in the kiln, and ready to paint! We added a coat of white paint and then colored tempera paint for the creative colored areas. The students were encouraged to do color mixing and take their time as it was very easy to make messes on the clean white "snow." Lasty, the students enjoyed adding a layer of mod podge for shine and GLITTER for sparkle! Oh yes, and the finishing touch... adding in twigs for the stick arms :) We hope the snowmen will serve as fun winter decoration for years to come!
We are now revisiting a project we started previously, VanGogh Inspired Sunflower Batiks! The students have been studying artist Vincent VanGogh and learned to draw sunflowers like his famous paintings. We are now taking their drawing and using it to trace glue onto fabric that will be made into a batik! The students will paint around the glue and then once the glue is washed out, there will be white lines left behind which is the key characteristic of a batik. Many artists use melted wax, but glue is much less dangerous for our first graders :)


Second grade artists enjoyed adding finishing touches to their Clay Picture Frames as we wrapped up our clay unit! This is one of those projects I teach that has a personal connection since I too made a clay picture frame in elementary school, and my mom STILL has mine on display, along with my sister and brothers. The students were encouraged to come up with a meaningful and unique design that also incorporated a variety of clay making techniques. All frames were made with a slab of clay that the students rolled out and cut into two pieces (the front of the frame and the base). They then were asked to add extra slab designs, coil designs, texture, and drawing. The students really had to be thoughtful and intentional about which design in their sketchbook would work best with the different clay making techniques.
As with any clay artwork that joins two pieces of clay together, the students reviewed the 4 S's (score, slip, stick, smooth) in order to successfully join the clay. After the projects dried out and were fired in the kiln, the students had the opportunity to give their frames a totally different look with COLOR! We used "naked" oil pastels first by rubbing the side on the top surface of the clay. The students then watered down tempera paint and let it settle into the deeper areas. They know the relationship between the oil pastels and paint is a competitive one. We want the oil pastel to win the battle and say "Don't go here paint! I was here first!" We can't wait for you to see the one of a kind frames, complete with the students picture inside! :)
We are now returning to a project we started and then paused while we completed the frames... Ocean Creature Mosaics! The students study oceans in 2nd grade, so it's such a fun way to connect what they learn! The students chose their own ocean creature (anything in the ocean that is living) and together we found a picture that they could use as a reference. We then studied mosaic artist Mary Wells who creates incredible mosaics made up of thousands of hand cut pieces of paper. We mimicked her art process of painting the background and then making the main subject of the artwork the mosaic. The students just started this step, but they are quickly realizing that it takes PATIENCE, PRECISION, and PRACTICE. This is the first time I am teaching this particular project, although I have taught mosaics in the past, including the fish mosaics that 3rd grade made (as part of the mural at St. Paul's fish market in Mequon)!


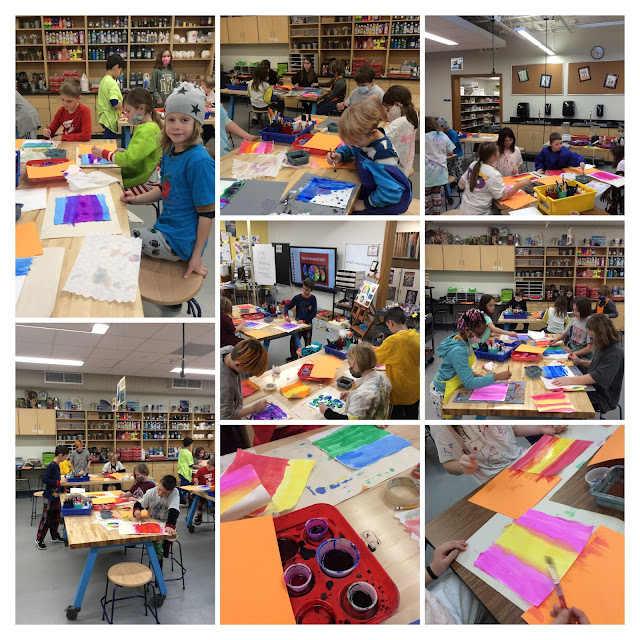
Third grade artists finished up their beautiful Holiday Lights Watercolor Paintings with the addition of the string. They got to choose either yarn or glitter to connect to the bases of the light bulbs. The project wasn't just a fun and eye catching artwork to create, it was also a great way to learn WHAT color families there are (primary, secondary, and tertiary) and HOW they are made, since the student themself had to hand mix secondary and tertiary colors.
We are continuing to learn about color in the form of a new project, Warm and Cool Agamograph and Collagraph Prints! This is a two part project that will require the artists to make Collagraph prints (a warm version, a cool version, and a bonus print in which they can choose any colors they want) as well as an Agamograph which is a form of kinetic (moveable) art where the image changes depending on where you are looking.
At this point, students have designed a Collagraph PLATE (like a stamp made with a COLLAGE of materials glued onto it). During the design process they were asked to create two designs, both non-representational or abstract (they couldn't do anything recognizable). They were painted with a layer of mod podge by some of my high school volunteers (former art students :) and are now ready to be printed! We look forward to showing you BOTH completed projects (the prints and the Agamograph) soon!


The 4th grade artists are now in the midst of one of the most challenging and rewarding art units they will take part in... portrait drawing! Actually, not just portrait drawing, SELF portrait drawing, which seems to be more intimidating for many and require even more of a GROWTH MINDSET! I tell the students that they are not alone in their hesitations and frustrations, because many ADULTS also make up their minds they that can't draw and drawing themself would be... well... painful for me to teach ;) So... our number one goal right now is to have that growth mindset and focus on the Studio Habit of Mind "Stretch and Explore" as we learn some really cool tips and tricks to drawing a realistic self portrait. Already, I have seen a great deal of progress and I can't wait to see how far they come when we wrap up the unit. Hopefully they don't forget all they learned!
In the pictures, you will see that the students started the unit by practicing each facial feature using help sheets and a mirror. I then had the students draw their first self portrait with NO HELP as a way to see what they can do and what they already know. Since football was a hot topic for many when I taught the lesson, I related it to training camp when the coach wants to see what you can do. My job as their "art coach" will be to see what they can do and help make it even better! I'm not sure if I convinced all of them, but at least they perked up when they heard football ;)
Following the first self portrait with no help, We drew "Self Portrait #2" which focused on: face shape (symmetrical and bigger on top - like an egg), gridlines (line of symmetry - which shows WHERE the facial features should go). Next class we will practice hair. We look forward to showing you their final self portraits soon!


Fifth grade artists are nearing the end (or at least over half way done, haha, it seems like it's taking forever) with their fibers unit! Once we spent a few classes getting comfortable with weaving, we jumped back into papermaking (in which 3 students can papermake at a time). We only have one more class to go with papermaking (yahoo!) and then each student will have created their own unique piece of paper. It is such a fun and interesting art making experience that every student enjoyed! When the outside of the weavings are complete, the students will receive back some of their handmade paper to sew into their weaving. The rest of their paper will be used for the cover of their sketchbooks and an additional artwork later in the year (we use it for 3 projects - so it's well worth the investment of time and energy)!
In the pictures you will see the students add their torn varieties of paper to the blender and fill it up with water. They can also add watercolor, crayon shavings, and glitter! These simple and easy additions make the paper so fun and unique. Even though there is some aspect of suprise with how it will blend together, the students are encouraged to plan ahead and think through how the colors will mix together. We talked about analogous colors (next to each other on the color wheel) being more desirable than complementary colors (opposite colors). Once the paper and water mixture was blended to make pulp, the artists poured it into a wooden frame with a mesh screen and plastic grid underneath. The papermaking devices allow the water to run through and the frame gives it a nice clean edge. We then evenly disperse the pulp and cover it with a cover screen so all of the water can be soaked out with a sponge. This is what flattens the paper and presses the fibers together. We hope you enjoy seeing the process and thank you SO VERY MUCH to their parent (and grandparent) volunteers that came in to help!!! I simply can't do it alone!


