Hello artists and families! In this combined art update, you'll see many of the classes continued to build on complex art projects that started in March and continued into April. The younger grades (kindergarten and first) completed projects and started something brand new!
We also sprinkled in some Easter and Earth day art activities for some classes, and celebrated TWO art shows in March and April! Below are a couple pictures of the artwork displayed art the Cultural Center. To see pictures of individual students and their work please click on the "Art Show" tab, or click HERE.
Enjoy looking through pictures and descriptions of all of our latest art happenings below! :)
Kindergarten artists completed their awesome Kandinsky Inspired Circles by showing TWO types of sewing around the border of their paper. In order to practice the two types of sewing ("running" and "whip/edge" stitch") the students used lacing cards. These helped a TON and prepared the students for sewing on paper. In order to choose the colors of yarn, the artists were instructed to choose oppositie (or complimentary colors) on the color wheel. The mixed media artwork looks AMAZING and I could look at each of them for hours. What a great opportunity for the students to explore a variety of art materials and methods (painting, drawing, gluing with glitter/sand/sequins/foam, and sewing with yarn).
 |
| Finishing our mixed media Kandinsky Inspired Circles! |
 |
| Practicing our sewing skills for the border or our artwork! |
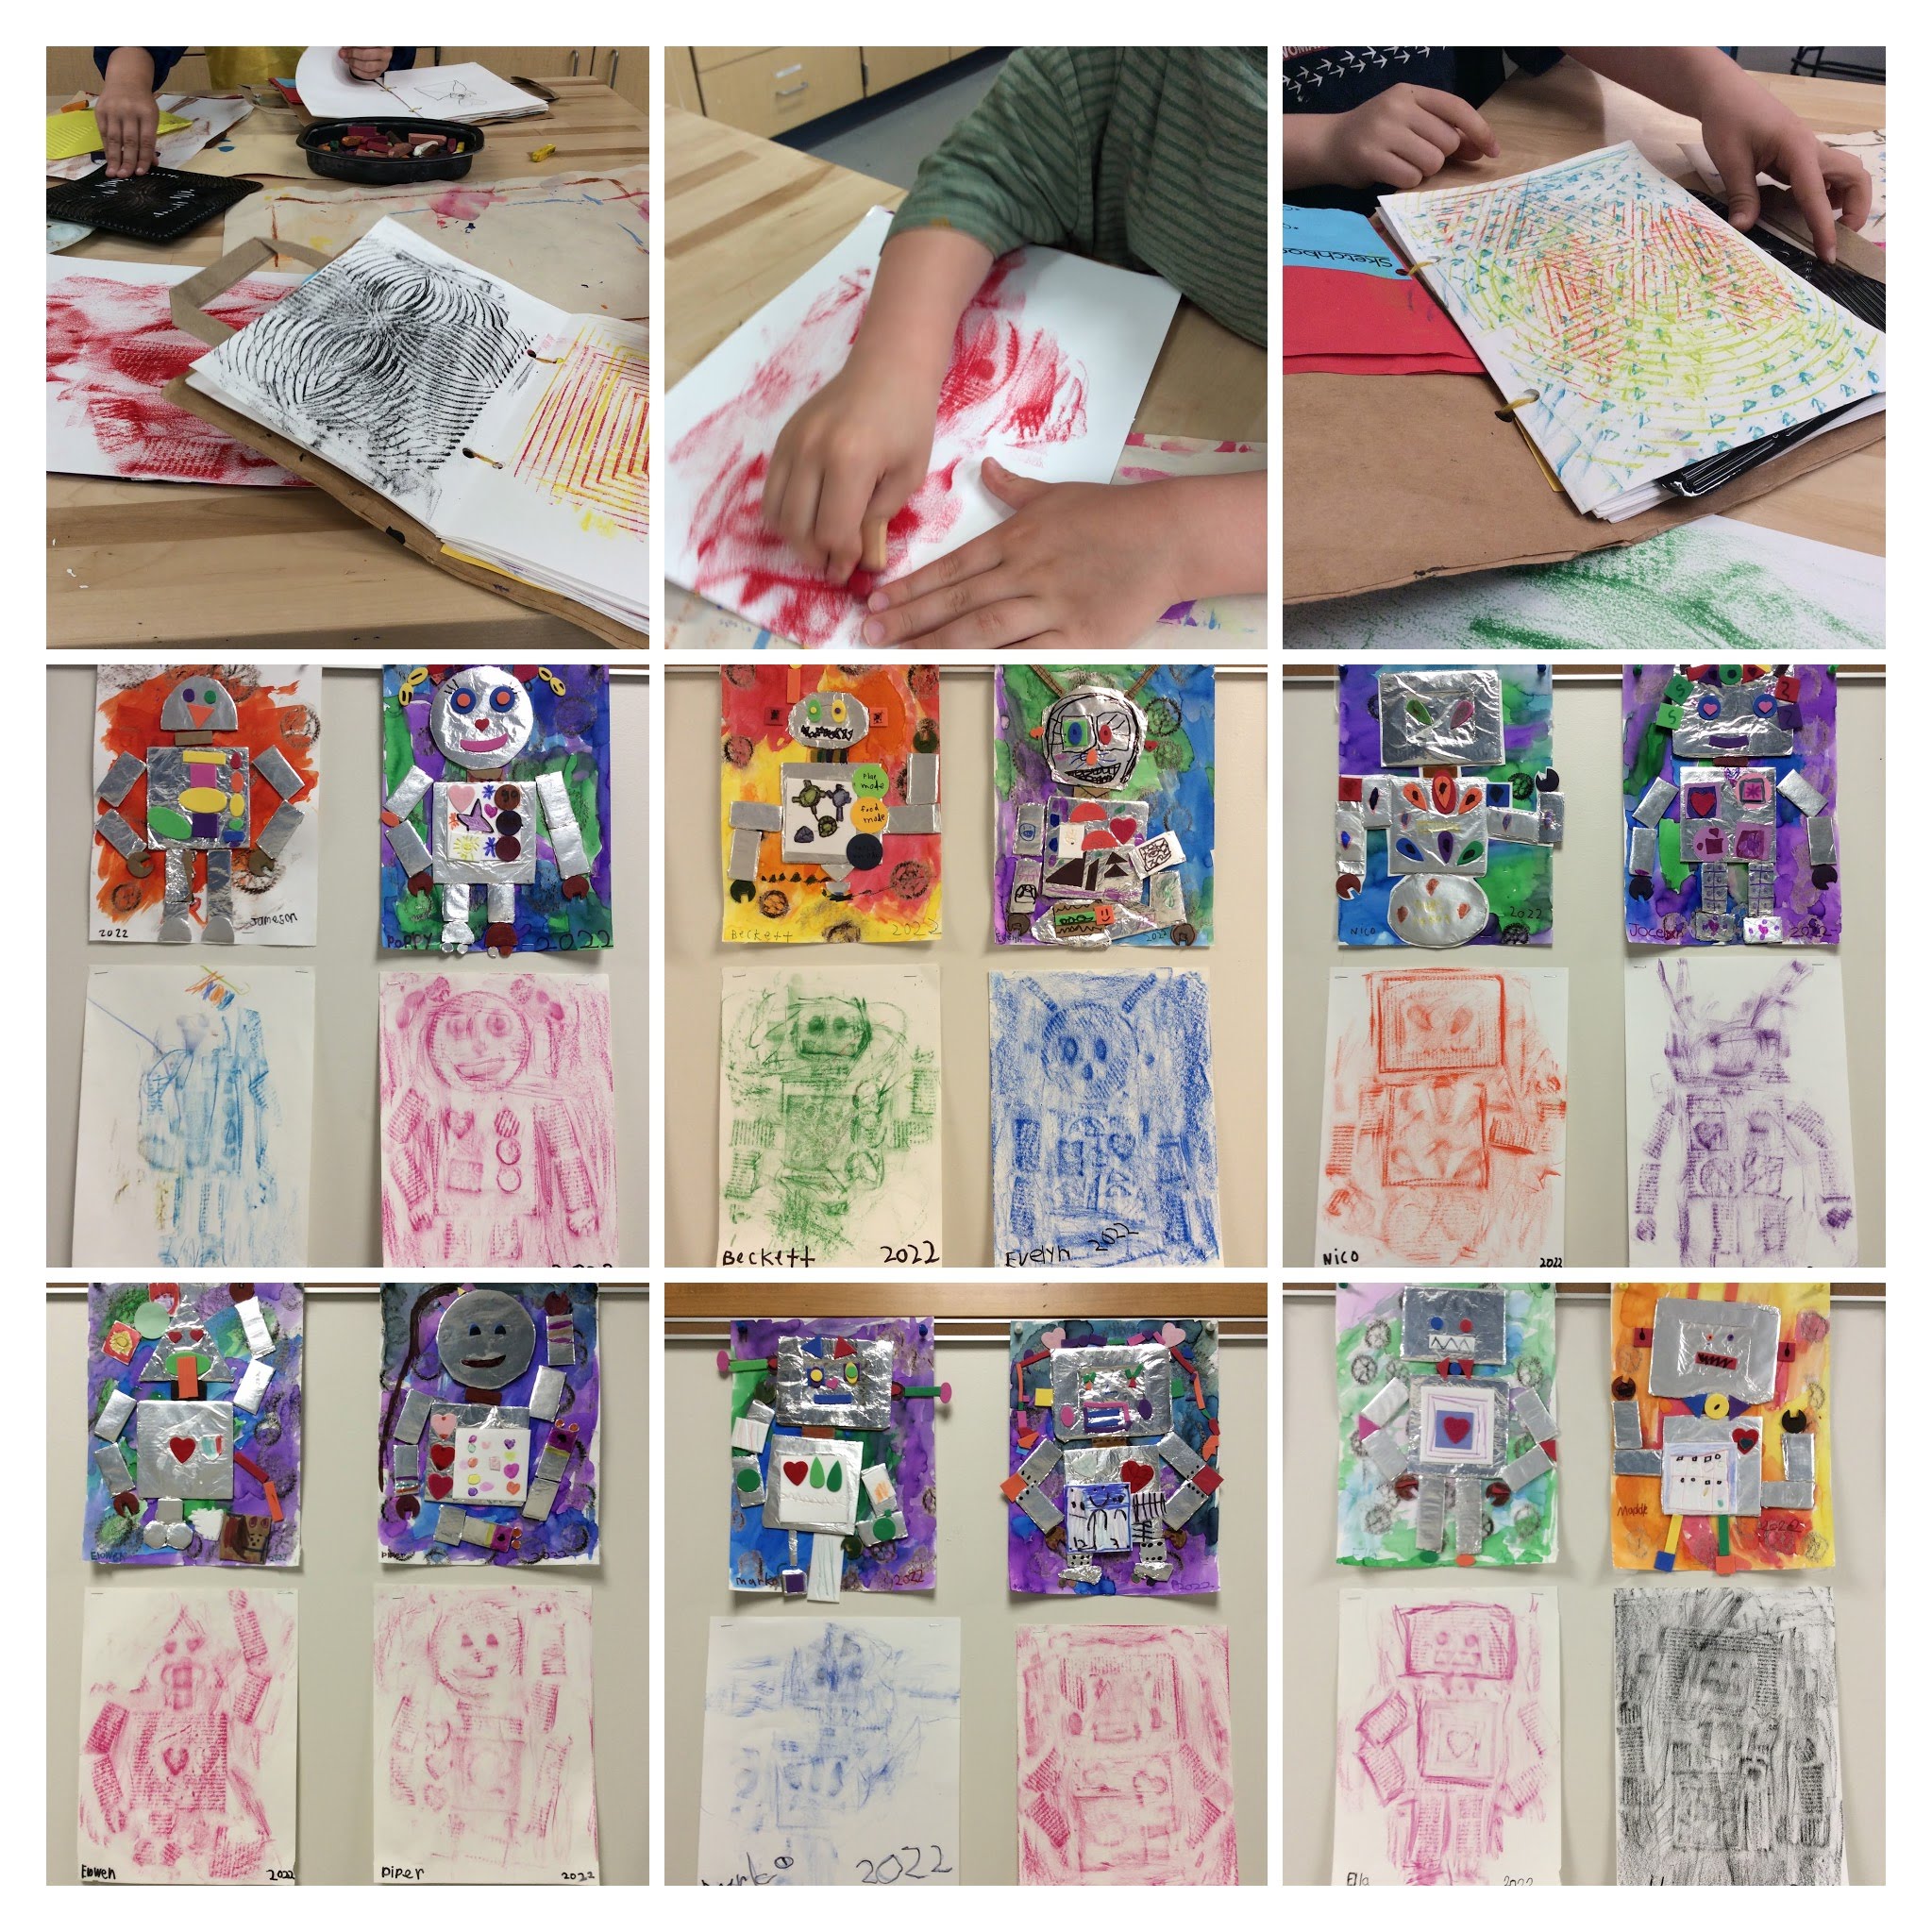
For our next project, we are creating one of a kind robots made from cardboard and tin foil! The backgrounds were made by doing crayon rubbings over wooden gears. The students then painted ANALOGOUS watercolors (neighboring colors, unlike the opposite colors they used for the last project) over the gears. Prior to creating their robots, the students completed a fun coloring sheet in which they needed to color in a key for a robot and identify the same shapes for each color. This prepared the students for the next class, which was to start designing their own robot using the cardboard and tin foil. Soon, the students will complete the robots and use it for another crayon rubbing!
 |
| Creating the background for our robots. Students first practiced the crayon rubbing of the gears in their sketchbooks. |
 |
| Coloring in our robot shape coloring sheets. Students colored in their own key so all the robots were unique. |
 |
| Creating their own one of a kind robots using cardboard and tin foil for the main robot shapes. |
First grade artists added some sewing to the border of their V
anGogh Inspired Paper Batiks! The students used the "running" stitch to go up and down the holes all the way around the border. They are now complete! After the Batik project, the students began making backgrounds for their
Kimono Self Portraits. The artists had fun using a new masking technique by painting around a cup to create a moon. they filled in the rest of their paper with blue water color. Once dry, the students drew and painted a tree (after having practiced in their sketchbooks). The BEST part of the tree making came when the artists were given straws and taught how to do blow painting! They were so curious how the would be painting branches without the use of their hands. They learned how to love the paint with air!
After the trees dried, we painted cherry blossoms by pressing down our paintbrushes 5 times in a circle. The bristles of the paint brush resembled a petal on a cheery blossom, so stamping the brush worked great! We are now enjoying starting the Kimono portraits by personalizing our skin color, hair color, and hair shape! The artists learned to draw their hair shape in their sketchbook and will soon cut out that shape on construction paper. Soon, we will be dying our kimonos (which are actually coffee filters died with marker and watercolor :)
 |
| Completing the running stitch on the border of our VanGogh Inspired Paper Batik! |
 |
| Enjoying blow painting as the students create smaller branches on their cherry blossom trees. |
 |
| Adding the cherry blossoms! |
 |
| Creating our hair shapes as we start our Kimono Self Portraits! |
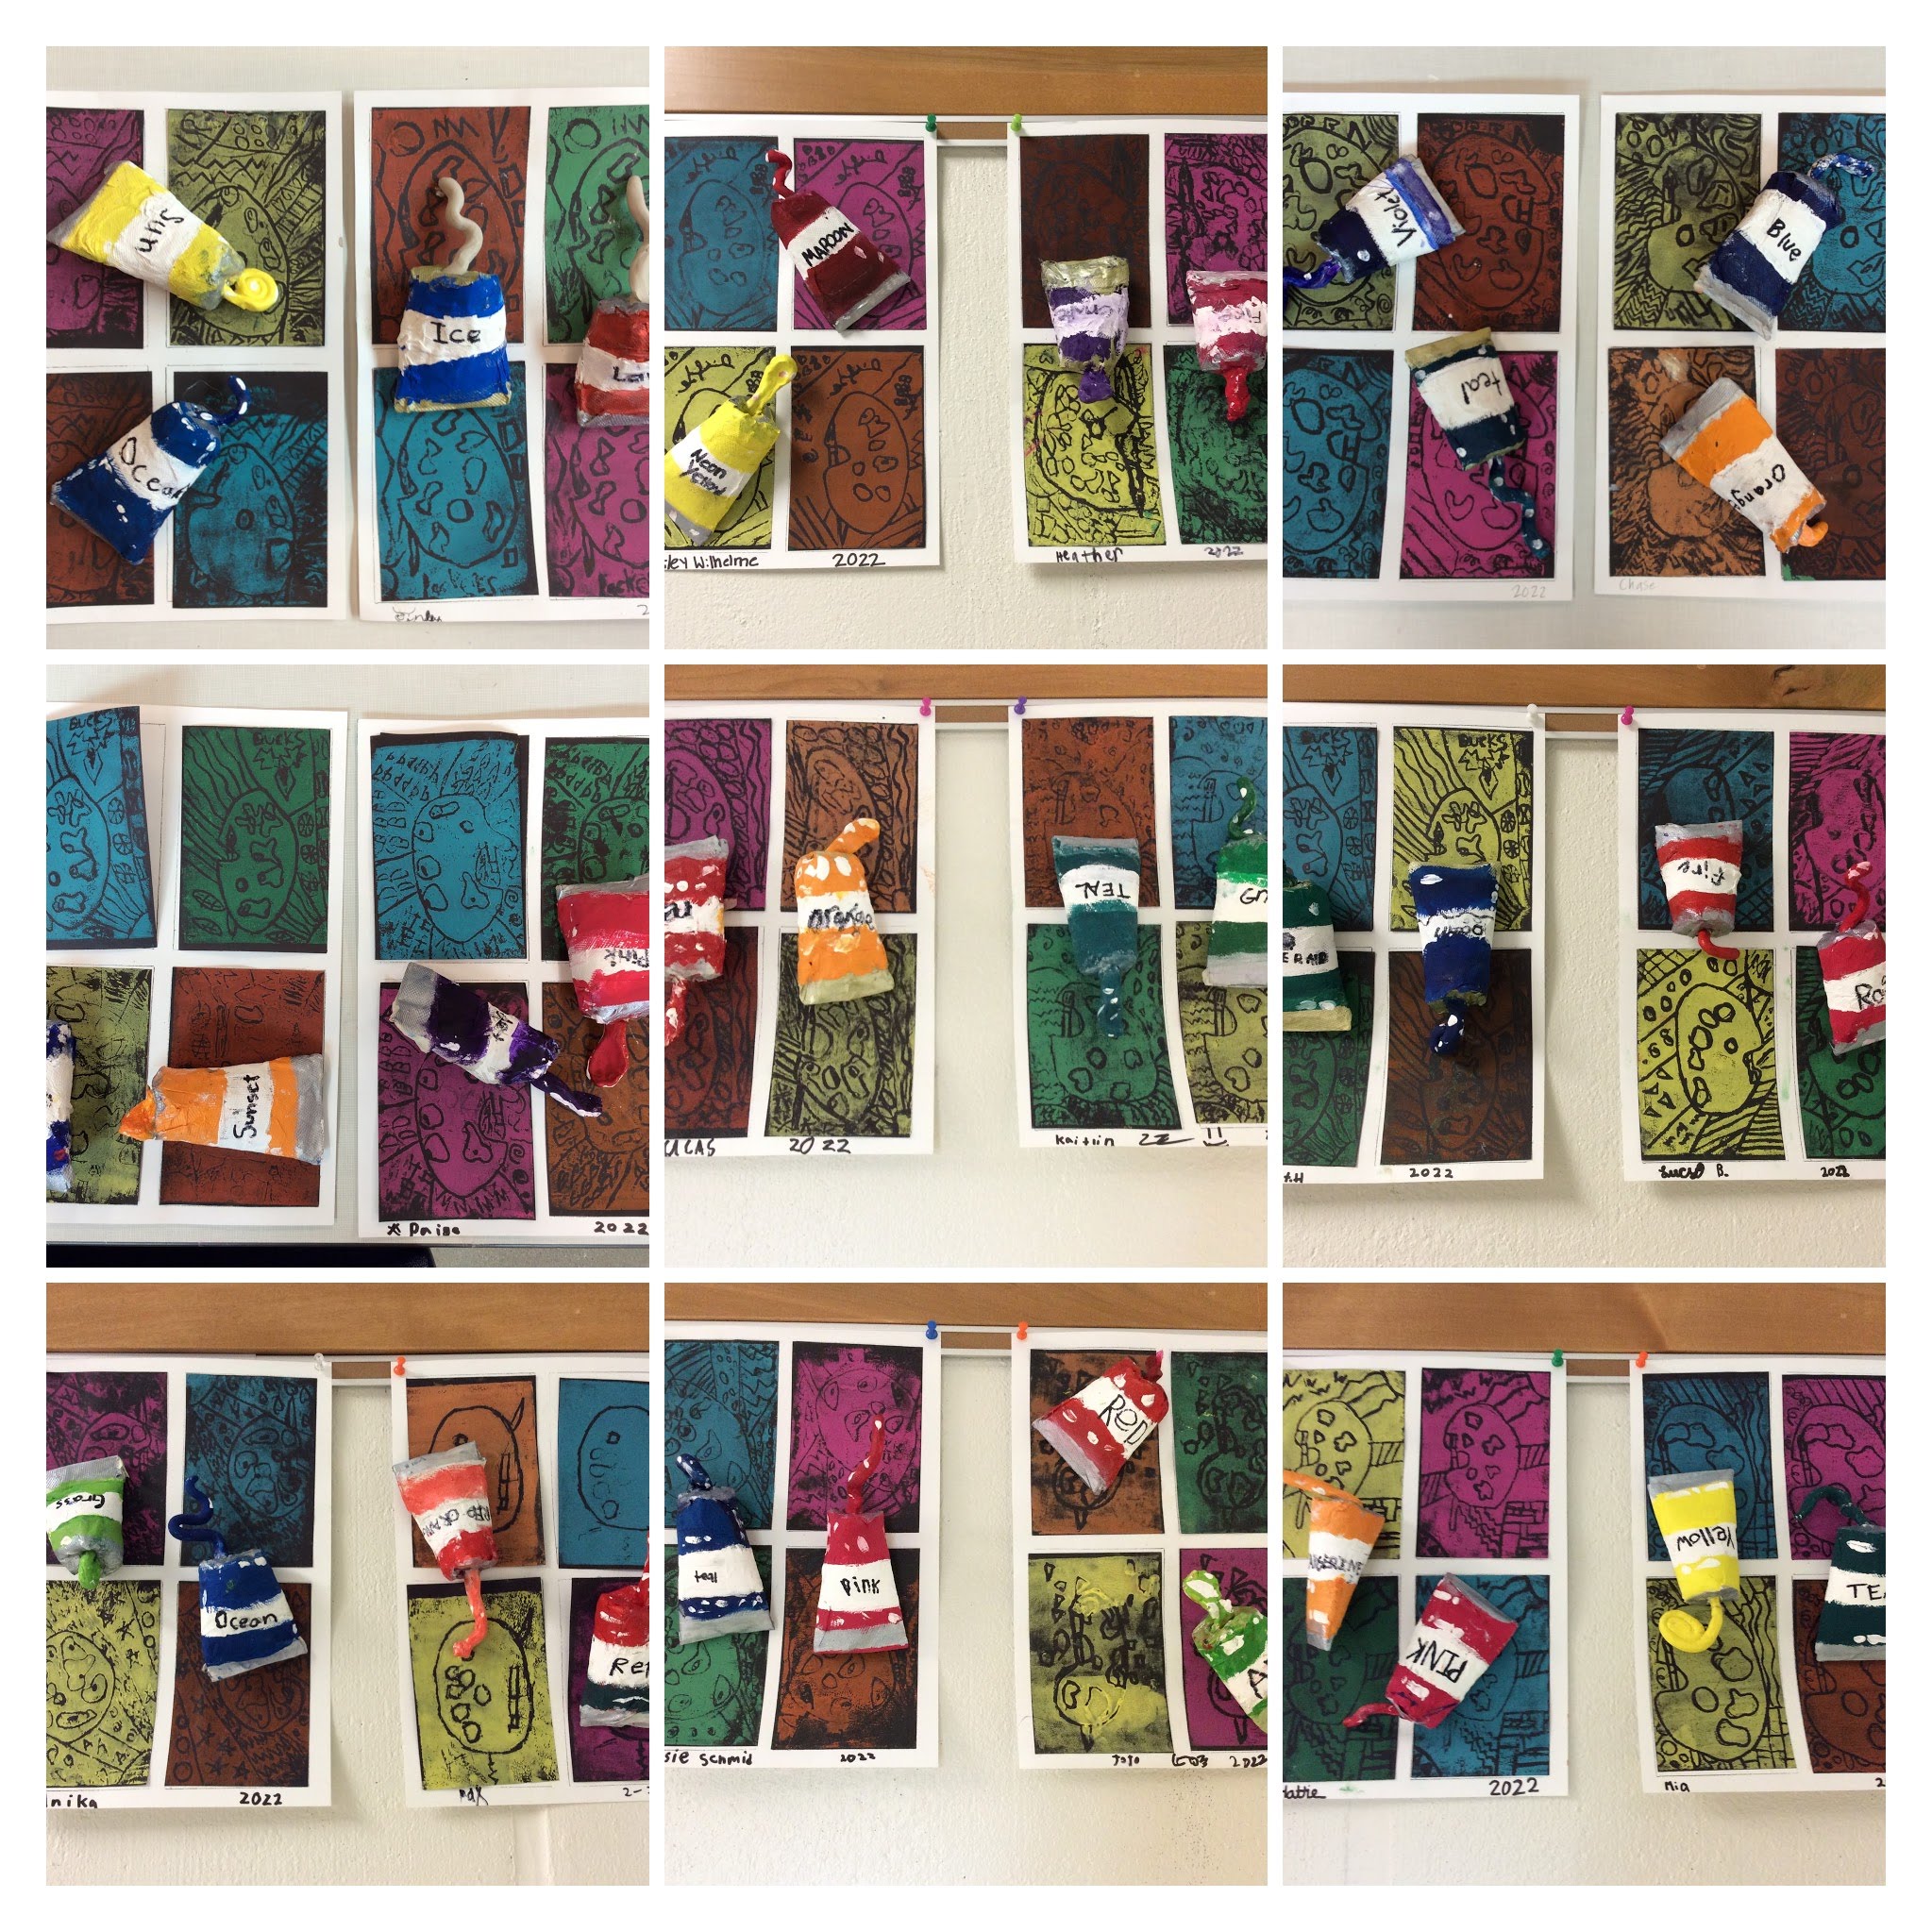
Second grade artists completed their Pop Art style prints back in March. They LOVED the relief printing process, especially the chance to print with 4 different colors. The wonderful thing about the relief printing process, is that you can reprint using your foam plate (like a stamp) if one doesn't turn out! The paint palette prints were inspired by Pop Artists Andy Warhol and Romero Britto.
 |
| Printing our Pop Art inspired backgrounds! |
The next steps was even more enjoyable for many of the students, making paper mache paint tubes! The students took two empty toilet paper rolls, pinched and taped one end, and then cut, folded, and taped the other end to resemble a real paint tube. Then came the ooey gooey paper mache process! As happens most year, some students LOVED the feeling of the paper mache paste (which feels like slime or gel), and other students could barley stand the feeling and wanted to wash their hands immediately. Whether they loved it or tolerated it, all of the students did a nice job dipping the strips in the paste, using "finger scissors to get off the excess slime, and then smooth it on the paint tube. The next step will be painting and completing the illusion of real paint tubes!
 |
| Easter themed how to draw artworks of the students' choosing! |
 |
| Creating our paper mache paint tubes! Check out some of the reactions to the paper mache paste! I LOVE the picture of Addalie and Isla... can you tell which one of them loved it and which hated it? |
 |
| Starting to paint our paint tubes! Students used a masking technique to keep parts white. |
Third grade students have been hard at work on their challenging and unique clay loom projects! The tricky clay making process required that they students roll out a giant slab of clay from recycled clay (without cracks or air bubbles). They then used a template to cut out the outside and inside circle. With the use of straws, the students removed small holes where the string would be threaded through to make a warp.
Once the clay was in the leather hard stage (between wet and dry) the students glazed every other section and prepared to transfer their chosen designs into the clay. Back in March, the students chose a black and white picture that represented their personality or something theur liked. They thn learned to edit the picture so that half of the picture flipped the black and white spaces (to show positive verses negative space). This was a tricky process, but the students learned a lot and seemed to enjoy the digital side of art making. We are now attempting to recreate the designs in clay by learning two different clay design techniques, sgraffito and free hand painting. On the side with the negative space, the students will carve away the top layer of glaze to expose the clay underneath. On the side with the positive space, the students will paint on glaze to show space being added. Although none of the looms are perfect, the students are learning a lot and having fun in the process!
 |
| Creating circular clay slabs for our clay looms! Not an easy task! |
 |
| Adding our positive and negative space designs! One side is subtracting glaze using the "sgraffito" technique, and the other side is adding glaze by paint on the other half of the design. Once again, not an east art technique but a fun challenge! |
 |
| Earth day art activities of the students choice! |
Fourth grade artists have been enjoying designing and creating their sewn stuffies! Back in March they started the design process which required that they envisioned and sketched out 3 different ideas. They could choose anything, and naturally the students chose a theme that represented their personality and something they liked. After creating the smaller sketches, the students drew a more polished sketch on a full sheet of 9X12 paper (this became their "pattern"). The students then got to select a colored or patterned piece of fabric that would become the backside to their stuffie (they loved this part). They thought it was pretty awesome that you can make one cut and tare the fabric making a straight edge (since the fibers are woven straight). Once they had their pattern pinned onto their plain muslin fabric as well as their colored fabric, they cut out the pieces together.
The students have now started to sew! We are using the whip (or edge stitch) to sew all the way along the perimeter of the fabric. The students are learning to use tools like a needle, needle threader, and thread. They are also learning sewing basics such as how to tie a knot, and what to do if things don't go as planned (there has already been plenty of this)! Once again, creating art is teaching these kids so much more than how to make a cool looking project. They are learning problem solving, perseverance, a growth mindset, self expression, and of course a unique art making process that could be the start to a favorite new art media and hobby! We can't wait to show you the next steps of paint, and stuffing, which are right around the corner!
 |
| Artists designing their patterns for their sewn stuffies! |
 |
| Selecting specialty fabric for the back of their stuffies. Students got to choose from patterned or solid colored fabric to compliment the front of their design. |
 |
| Sewing! The first class was a challenge for many, learning so many new techniques (threading a needle, tying a knot, etc.) but they persevered and caught on fast! |
Fifth grade artists are thoroughly enjoying every phase of making our clay cakes! Back in March the students began the planning stages of the project and compiled images of inspiration onto a Google doc. They needed to consider what the inside of their slice would look like (how many layers? what types of textures and flavors?) as well as the back of the take and the top. The topper of the cake is meant to be a show stopper and demonstrate a variety of clay making techniques the students have learned in grade K-5 (pinching, coil making, slab making, texture, and of course the "4 S's:" score, slip stick, and smooth... in order to successfully join clay together).
The student began the clay making process by rolling out slabs (flat pieces) of clay and cutting the 5 pieces to fit the paper templates. They then got to designing, first the side pieces, then the back piece, and finally the top piece. The artists are now seeing the cake come together by joining 4 of the 5 with the top piece being a removable lid. Every year, I continue to be blown away at the students creativity and skill level. They are loving the process and they can't wait to paint them after they have been bisque fired in the kiln... very soon!
 |
| Clay cake sketches. The students had lots of fun brainstorming and planning ideas! |
 |
| Rolling out and cutting slabs! |
 |
| Taking a one day break from our clay to do a free choice earth day art activity! :) |
 |
| Back to designing and WOW are they looking great! |
 |
| Check out those AMAZING clay cakes!!! |